There's no special level editor for Wings. The levels are generated from bitmap pictures using MAKELEV.EXE. So, you only need a bitmap drawing program. For example Window's Paint is one - but it sucks big time - do not use it. Also some popular graphics software are no good, software like Photoshop and Paint Shop Pro. Practically you need a software that allows you to draw in 256 color mode pixel by pixel if needed. Of course you can do this with the software mentioned before, but the tools are very nasty to use for that purpose. Luckily, there are few programs designed for low-resolution low-color working. I prefer those.
Finding a suitable program might be a little tricky. There seems to be only few good ones. I have found only two programs suitable for drawing levels, and both are for DOS. The two are Deluxe Paint II E and GrafX2. I really don't know any good software for Windows!
So, I work with DP2 and GrafX2 plus I sometimes do something with old Paint Shop Pro (version 6.12). In these instructions, I focus on GFX2. You can get it from http://www.pixel.scene.org/html/tools.html
GrafX2 isn't that hard to use, you just need to get familiar wit it. I mean, it doesn't work like usual Windows based software. Play around with it and try everything. That's the best way to learn new things!
Also, you have to understand what is a picture with indexed colors. For making levels for Wings, you need one or two bitmap pictures that are in 8-bit -format. That is a picture with 256 colors palette. Palette is a color table of a picture. Each color has a number from 0 to 255 (or in hex, 0 to FF). So, in order to make a level, you have to work with a piture with 256 colors. Hi-color images, such as jpg, won't work. The most common 8-bit format are PCX, GIF, BMP and LBM. The images must be in PCX format when converting to level, but it doesn't matter if you work with BMPs, LBMs or GIFs if you save them as PCXs first. The image quality won't suffer.
Back to palette. Here is a piture of GrafX2 in palette edit screen. Here you can see the whole palette. There's another picture of the palette showing the color numbers.
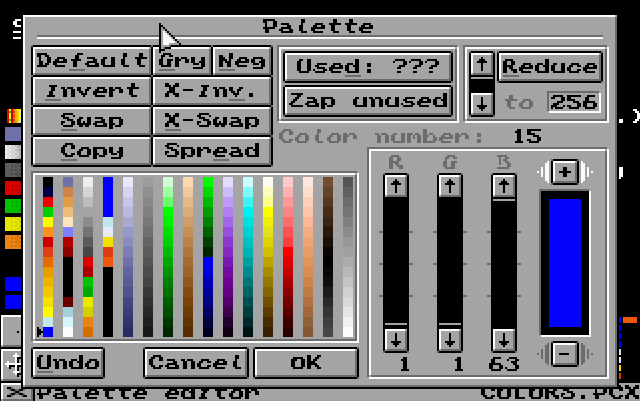
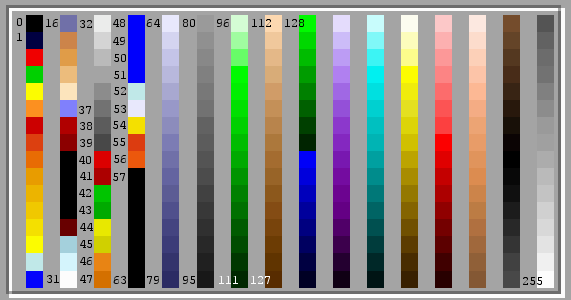
Let's make an example. First you make sure that the whole picture is filled with black. That's the first color of the palette, color number 0. That's the air where you fly in. If you wan't to draw normal ground, you pick any color between 128-255. Then you want to put some water to your level. Use colors between 48-51. Next you'd like to draw indestructible borders for the level - for that, use colors between 80-95. Finally you draw few bases to level, simply wit colors between 32-47. Simple, right? And don't worry about the palette numbers, you will learn to remember where the needed colors are, then you don't need the color numbers.
Now more detailed listing of the colors:
0: Background. This is the air where you fly. If there isn't any, you don't have any room to fly and the level won't work.You can freely modify the colors betwen 48-255.
1-31: These colors are reserved and should not be used in level (exept for color number 16)
16: This color creates water. Water starts flooding down from this point.
32-37: Bases must be drawn with these colors.
38-39: These colors are for indestructible base, you can not repair ships on these.
40-47: These are player specific bases.
48: Basic water.
49-51: Water with currents. Note that these work only if 'flowing water' setting is set off in the game.
52: Bubbles.
53: Snow.
54: Fire. This is a background olor, so you can fly in it, but it will cause damage.
55-56: Explosive. If you shoot these colors, they will pop.
57-63: Reserved colors. Again, you shouldn't use these.
64-79: Backround. You can fly over these colors.
80-95: Indestrutible. Well, as it says, you can't destroy these colors.
96-111: Soft ground. Like normal ground but you won't get any damage when hitting it.
112-127: Burning. Like normal ground, but starts burning when shot.
128-255: Normal ground.
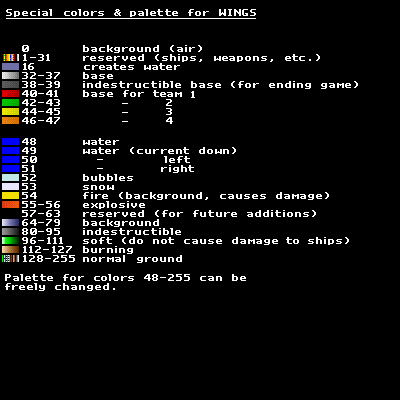
It might be a good idea to take advantage of the COLORS.PCX when starting to make a new level. Load it into GFX2 and you have nice 400 x 400 sized image with all the needed colors. Click CLR -button and you get a blank image ready for action.
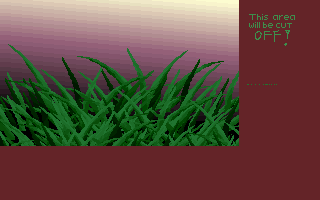
When you have finished drawing your level to some extend, go and make level from it and test it. If it's good, keep on going until you have nice level. Only one picture is enough for a level, but if you feeling pro you can draw parallax image right away (What is parallax you ask? Well, it's the image scrolling in background of the level). There are few technical things that you must remember when drawing the parallax. First, the parallax must have the SAME palette as the level image. And second thing, parallax has to be smaller in size. This is how you should calculate the size:
width = width of level / 2 + 78 (pixels)So, with 400 x 400 sized image, the parallax would be 278 x 245. The parallax picture doesn't have to be the exact size. It's enough if it's at least the calculated size. The rest is automatically cut off. So it doesn't matter if you use same sized images for both level and parallax.
height = height of level / 2 + 45 (pixels)
These thing are explained in MAKELEV.TXT which is provided with Wings. Unfortunetely, it's in Finnish, but you should get all the needed info from this document.
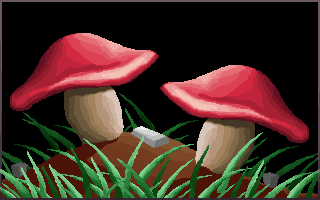
Here's another example. These two pictures, level (MUSHLEV.PCX) and parallax (PARALX.PCX) make together a nice level ;) Download these files (MUSHLEV.PCX, PARALX.PCX and HAPPO.LEV) in one zip file here. Feel free to examine these files and use them as reference.


MAKELEV.EXE is a small program that generates the level file from one or two PCX pitures. It comes along with Wings. It's a DOS program, but you an launch it from Windows too.
This is how to use the makelev.exe:
1. Copy your PCX picture(s) into the same folder than makelev.exe
2. Run makelev.exe
3. The program asks first picture. This will be the level itself. Give the name of the PCX-file. (With the example files, it would be "mushlev")
4. Program asks for parallax. If you have picture also for the parallax, answer "y". If not, answer "n".
5. If you typed "y", the program will ask for the picture. Type the name of your parallax picture. (in this example, name would be "paralx")
6. The program will ask for the stars. If you wan't stars to the level's background, type "y", otherwise "n".
7. Then, the program asks if you want to use default settings. If you do, type "y", and if you don't, type "n".
If you typed "n", you'll have to type few values. These are:8. Finally, program will ask name for the level. (In our example, it will be "happo")
Rain probability = the probability for the rain in this level given in percents. (For example, if you type 50, there will be 50% possibility that it will rain when playing this level.)
Snow probability = the probability for snowing
Bombing probability = the probability for bombing
Civilians = Number of the little men (without gun)
Armed civilians = Number of armed little men (with gun)
The use is simple, just follow what the program asks. And remember, do not delete the PCX files because you can't convert the level back to pictures. Always save copies of your pictures. They might come handy.
These instructions should get you going if you're planning to make levels for Wings. But if something is still unclear or you need some help, don't hesitate to ask me via e-mail. I might extend these instructions but how and when I don't know. Until then, make some fantastic levels!
-Ilkka Sjöstedt / ilesj@mbnet.fi